For this project, I’m utilizing some in your area sourced from Spanish Chestnut. This was really lowered by an expert lumberjack buddy of mine– fresh from the hills of Northumberland! I’d left the piece to dry in my workshop for around 1 year, which I’m hoping suffices for a reasonably little piece like this. Considering that it had actually been cut with a chainsaw it had extremely rough edges and absolutely nothing about it was flat.
Flattening the Spanish chestnut
I utilized my hand aircraft to tear down any actually huge high areas. I then connected an MDF support board to the piece to offer me one straight edge. I might utilize that edge as a referral to run the piece through my bandsaw When I had one straight edge I might then turn the piece and tidy the other edge, once again on the band saw. After that, I connected a piece of MDF to among the thin edges and ran it through my bandsaw vertically to provide it a slightly flat bottom side.
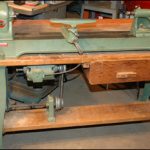
Utilizing my old Kity planer
I’ve got an older Kity planer/thicknesser and it works exceptionally well for tasks like this. I begin my planning the flat edge formerly cut on the bandsaw. This is done on the leading planer side of the device. This provides me a truly flat recommendation edge to sweat off. From there I run it through the thicknesser numerous times, being extremely mindful not to take excessive off in one pass. After about 10 goes through the thicknesser, I handled to get the piece to a consistent density with a great flat top and bottom. I rounded off the edges by running it through the table saw two times.
Sculpting the Bowl Shape utilizing a Saburtooth
Prior to beginning on anymore external shaping, it was time to hack out the real within the bowl. I did this utilizing a Saburtooth Donut Wheelon my Makita Angle Grinder. The Saburtooth is a 4 ″ metal disc with curved edges and a 7/8 ″ tired developed for angle mills. It’s covered in countless small metal spikes that bone up at the wood. The factor I’m doing the sculpting now is because this is where things can go terribly incorrect. As such there was no point in costs ages getting the external shape ideal just to filth it up later on. I slowly took the bowl shape working throughout the grain. I discovered it much quicker to work throughout the grain instead of with the grain. When I got closer to the wanted shape I made gentler and gentler passes to leave a smooth surface.
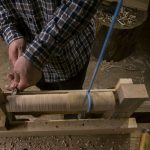
Cutting the external bowl shape
I passed the sides of the bowl through my table saw, putting a 30-degree bevel on each edge. I then matched this bevel on my bandsaw to cut the curved edges. I then changed back to the Sabertooth once again to soften all of the external edges.
Lots of sanding!
The inner bowl required a LOT of sanding. I covered some P60 sandpaper around a tennis ball and utilized this to sand the internal surface area of the bowl. This technique worked truly well however it took a LONG time. I slowly developed the grits and likewise changed to my DeWalt Palm Sander whenever possible. I sanded the external edges utilizing my 150mm Erbauer Random Orbit Sander utilizing P80 grit sandpaper. I then worked from there to my smaller sized 125mm DeWalt Random Orbit Sander utilizing a P120 grit paper. This offered a charming smooth surface. I handed sanded with finer grip paper to complete whatever off.
Using the brass stencil lettering
I utilized 2 ″ flat brass stencil lettering. As this is created for a flat surface area it was a little challenging to get an excellent stencil on a curved surface area. I pressed the middle of the stencil to comply with the shape of the bowl and sprayed each letter separately, masking off all the other letters as I went on. When this was dry I utilized some wire wool to rub away any overspray and likewise to soften the letters somewhat. Without doing this the black lettering would have been a bit too ‘in your face’.
Ending up with Osmo oil
I utilized my preferred Osmo Polyx Oil to end up whatever off. This is a charming permeating oil made from natural oils and waxes. It’s incredibly difficult using and I chose the 3032 Clear Satin variation. It can take an excellent couple of days to effectively solidify so eventually I may provide really light sand and use the 2nd coat to leave a silky smooth surface. This oil is actually developed for wood floorings so the jury’s out whether it’s food safe. I could not discover anything stating it isn’t!